How To Root Amazon Kindle Fire In One Click

While Amazon had said that it wouldn’t stand in the way of anyone wishing to take a spanner to its Kindle’s software, it wouldn’t have been the first time a hardware manufacturer had reneged on a promise, so we’re glad to see they have played ball.
So, how do you get that ball rolling? Turns out, it’s actually pretty easy.
Enable ADB Access
If you’re the kind of person that likes to get intimate with your Android hardware, access the file system and generally get your hands dirty, then you’ll be needing ADB access, or Android Developer Bridge for those not all acronym’d up.
To get access, you’ll need to get hold of the Android SDK from here and then add the Vendor ID for Amazon’s Lab126 (0×1949) to the adb_usb.ini file. Chances are that if you’re doing this, the previous sentence made perfect sense to you, but if not, a quick Google search will yield the information about the Android SDK that you require.
Step 1: Go to %USERPROFILE%\.android , once you’re there, edit the adb_usb.ini file and add the following line at the end:
0x1949
Save and exit.Step 2: Navigate to the location where you have installed the Android SDK; open the folder labeled google-usb_driver and hunt down the android_winusb.inf file and under the following lines under the [Google.NETx86] and [Google.NTamd64] sections:Save and exit the file. That’s it, you’re done with the ADB part.;Kindle Fire %SingleAdbInterface% = USB_Install, USB\VID_1949&PID_0006 %CompositeAdbInterface% = USB_Install, USB\VID_1949&PID_0006&MI_01
Enable Root Access
Step 1: Plug in your Kindle Fire to your PC, we’re assuming you’ve already plugged it in since you did go through the above written ADB hassle.
Step 2: Open Device Manager from your PC, and under “Other Devices”; you should see the Kindle Fire, now select the android_winusb.inf file.
Step 3: Enable installation of apps from Unknown Sources. You can do so by tapping the top-most bar on your Kindle Fire and navigate to Choose More and head over to Device, over there you should see a listed device.
Step 4: Head over to this thread over at XDA and download the SuperOneClick tool.
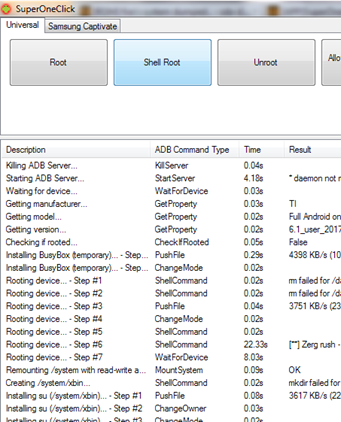
Step 5: Run SuperOneClick and simply click on the Root button on the top-left of the tool, that’s all. You now have a rooted Kindle Fire with complete Superuser access. Refer to the screenshot below if you’re still confused where / what to click.

We’ll go through the drill one more time just to make it more clear on how to install third-party apps; head on over to Settings, and then Device. You’ll want to turn on ‘Allow Installation of Applications’ and hit OK when the warning box pops up. Amazon will warn about possible security risks, but we’re sure you’ll be fine with that given the plus side to installing your own apps.
That’s it, your $200 android tablet just got a whole lot more interesting, not to mention more useful. Awesome!
(source XDA)
You can follow us on Twitter, add us to your circle on Google+ or like our Facebook page to keep yourself updated on all the latest from Microsoft, Google, Apple and the web.
0 nhận xét:
Post a Comment